Many times, people are heard saying that the hologram heat transfer vinyl or Holographic HTV is hard to work with. In the sense that it is hard to cut, hard to weed and overall hard to work on. You might feel this to be the case because of the shiny pattern on it. But it is never the case with cutting, IF, you have the correct cut settings on for your cutter.
So, in this article, we will talk about the basic steps on using hologram heat transfer vinyl. Because, holographic is fun. Seriously! And once you get your cut settings right, you’ll see how it weeds like a dream.
Layers in the hologram Heat transfer Vinyl
In the hologram HTV, it has 3 layers. The backside is the adhesive. The middle part is the actual holographic design, and the front part is the clear carrier sheet to make for easy transfer.
Hence, you have to cut neatly and accurately through the adhesive layer and the holographic vinyl design as well. And it can get a little difficult. But, keep in mind that you have to cut through it like you would on the glitter HTV, even though it’s not as thick as the glitter HTV.
CUT settings
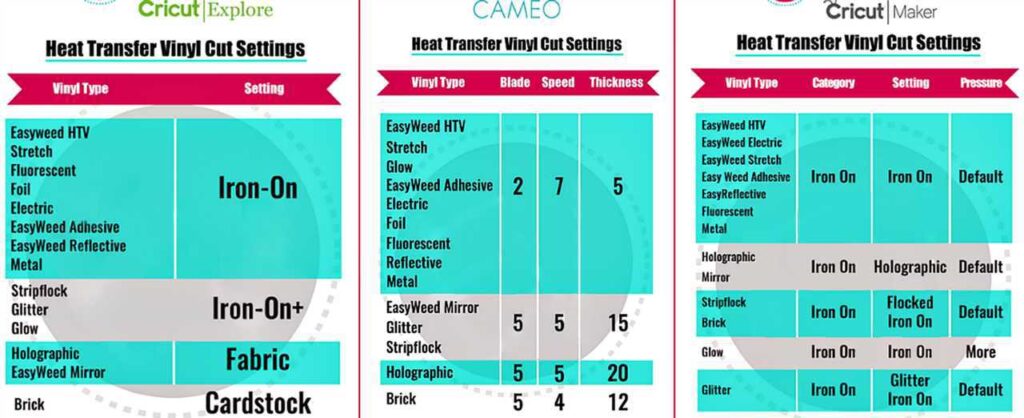
For different cutters, there are different cut settings. Let’s discuss the settings to follow for holographic HTV on 3 widely used cutters, viz. Circuit Explore, CAMEO, and Circuit Maker. The cut settings differ for each machine, and vinyl type. Therefore, test cuts are always recommended. You can see the cut chart below to get an idea of the settings you need to use in order to cut properly.
How to feed vinyl into the cutter
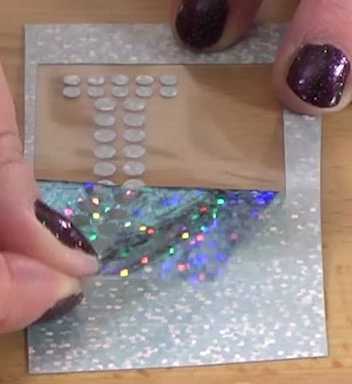
To cut the holographic vinyl, always load the vinyl into the machine with the shiny side down and the adhesive side up. It is very important to mirror the image that you are cutting into it.
After do the cutting, it is still difficult to see it because of the shiny pattern of the material. Therefore, take a little piece of the vinyl and roll it around gently to pop the seams open. With this you’d be able to see the cut lines. Thus, it’ll make weeding much easier.
Heat pressing the holographic HTV
Now, once you have weeded the excess material out, it’s time to press it into the garment. It doesn’t matter if you are using an iron press or a heat press as long as the heat, and pressure is sufficient and even.
§ This material works with both type of presses. Holographic takes a little hotter temperature, i.e., around 320°
§ Also, press it for a little longer than the usual, which is for 15 to 20 seconds.
§ After pressing it, wait for it to cool down as to peel in cold.
§ For best results, wit for at least 24 hours before washing the garment.
Another cool thing to do with holographic is. That if we cut it into small circles, it gives the rhinestone effect as well.
So, with all the fun colors and great inspirations to create things with holographic HTV available online, the process is sure to get fun.
Leave a Reply